Free-Line Live Bait
Build: Main line → leader → circle hook
Best for: Natural presentation in light current/shallow to mid-depth water
BigJoe tip: Add only enough weight when necessary; natural swimming is the advantage.

Clear component order, stronger scanning and practical visual reference.
Use each verified guide for exact components; never fill missing specifications by assumption.
Core rigs from mangroves and flats to reef and offshore water.
Build: Main line → leader → circle hook
Best for: Natural presentation in light current/shallow to mid-depth water
BigJoe tip: Add only enough weight when necessary; natural swimming is the advantage.
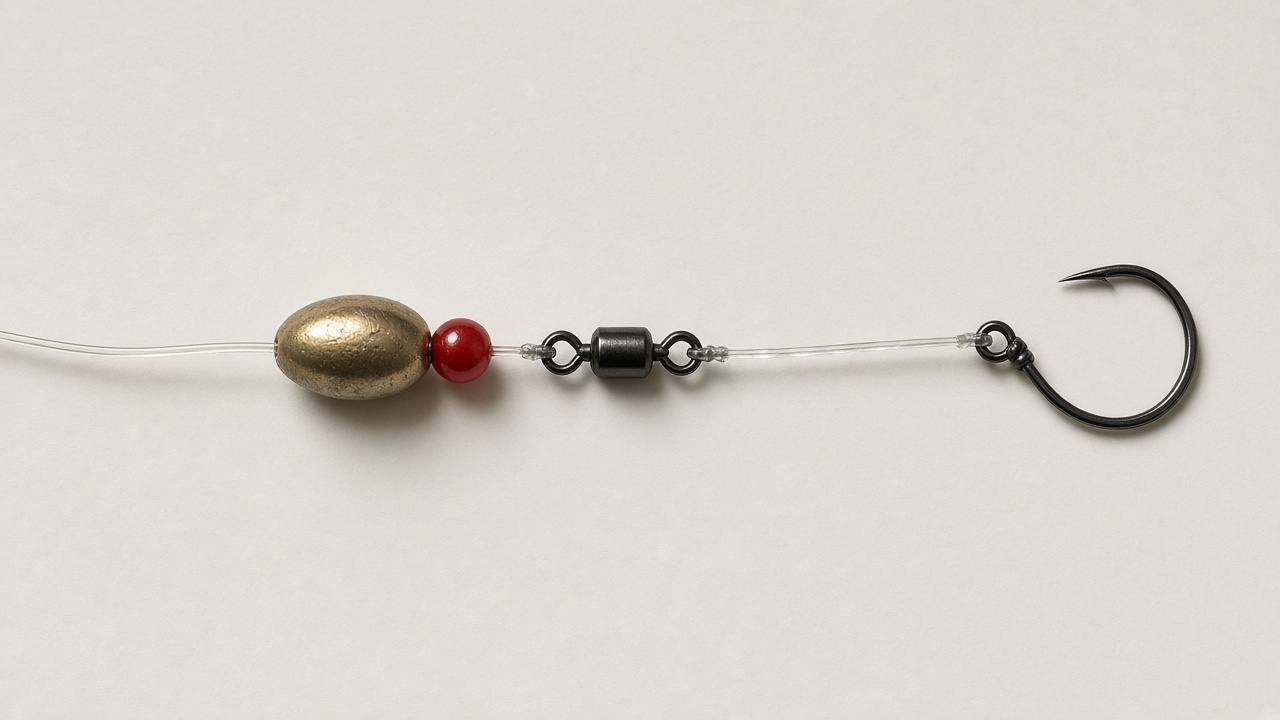
Build: Main line → sliding sinker → bead → swivel → leader → hook
Best for: Bottom fishing where fish should take bait with limited resistance
BigJoe tip: Use the lightest sinker that holds bottom.
Build: Main line → egg sinker sliding directly to hook/short leader connection
Best for: Compact bottom presentation around structure
BigJoe tip: Simple and effective, but monitor abrasion constantly.
Build: Main line → sinker → bead → swivel → leader → hook
Best for: Flats, channels and bottom presentations with separation between weight and bait
BigJoe tip: Lengthen leader in clear water; shorten for control in structure/current.
Build: Main line → cork → leader → jig/shrimp/hook
Best for: Shallow inshore water, grass edges, mangroves and channels
BigJoe tip: Set leader length so bait works above grass/structure.
Build: Main line → sabiki branches → sinker
Best for: Catching small schooling baitfish where legal
BigJoe tip: Control exposed hooks carefully; dehook bait directly into livewell.
Build: Main line → swivel/dropper → sinker branch + leader/hook branch
Best for: Current and deeper bottom fishing
BigJoe tip: Use a sacrificial/light sinker branch around snaggy bottom.
Build: Main leader with two dropper hooks → sinker at bottom
Best for: Smaller reef/bottom species and prospecting depth
BigJoe tip: Check current hook/reef-fish regulations before using multi-hook rigs.
Build: Leader → hook → bait spring/wire or lawful rigging system → ballyhoo
Best for: Mahi, tuna, wahoo and bluewater trolling
BigJoe tip: Rig bait straight so it tracks without spinning.
Build: Main line → swivel/connection → appropriate bite leader → lure/hook
Best for: Wahoo, barracuda and other toothy fish
BigJoe tip: Use only as much bite leader as needed; heavy wire can reduce bites.
Use the lightest practical weight and leader that still gives control. Inspect every connection after abrasion, teeth or a hard fish.